
The UKGC Quick Setup guide

- Your ascension into the realms of high fps, graphically exceptional, limitless gaming is almost here… -
There are however a few things that you need to make sure you get right in order for everything to work properly, so we strongly recommend reading the whole of this setup guide. Don't worry, I'll try to make it as concise as possible.
1 – UNBOXING
Before you get started, if you haven’t already, you’ll need to unpack the system. Our packaging is pretty bespoke, so we’ve created an article to walk you through the unboxing process, you can find it here.
2 – CONNECTIVITY
Below is a picture of one of our Custom PCs, annotated to show what every port or button does. It has almost every available expansion card, so don’t worry if yours doesn’t look exactly like this.
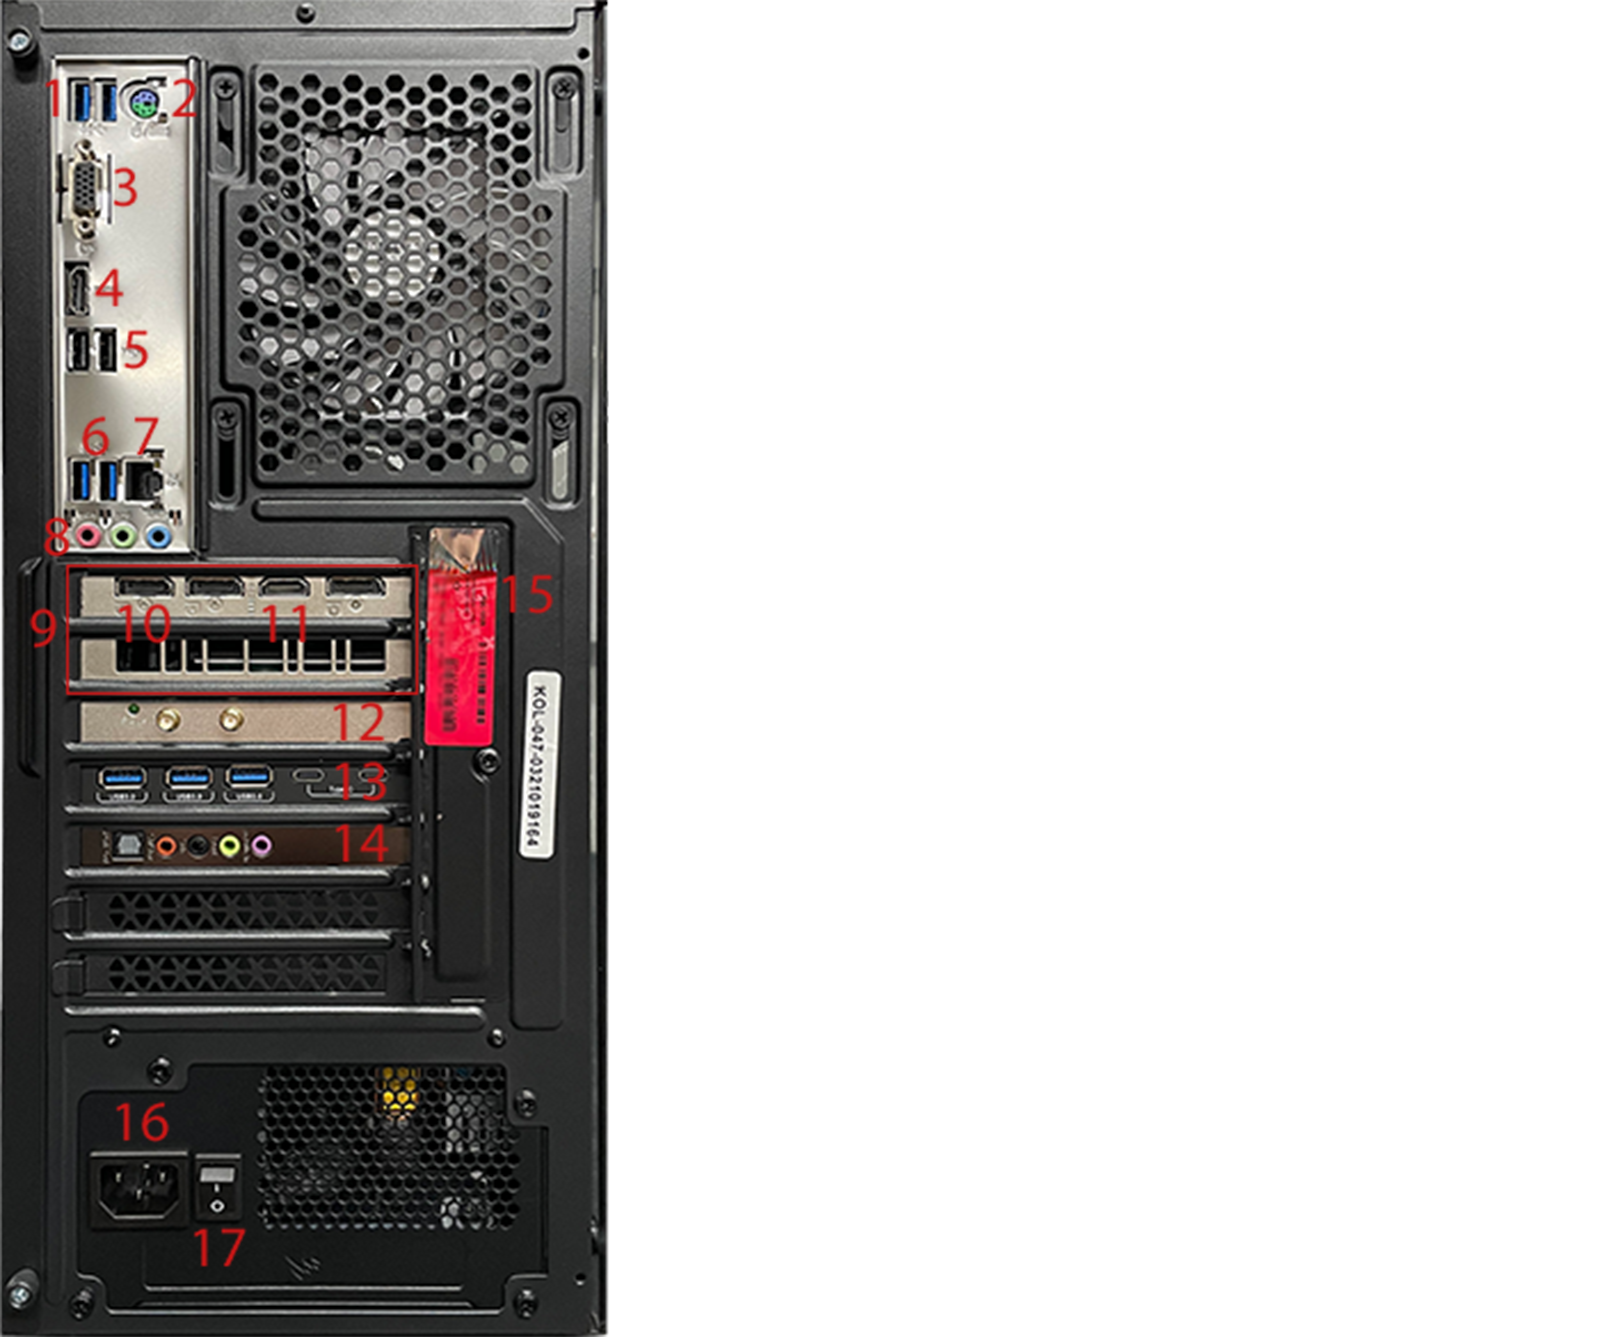
There are two main sections of the connection ports, the integrated ports which are present at the top of the PC which plug directly into the motherboard (1-8), and the expansion slot ports which are expansion cards (9-14). If you see that you have the same ports in the integrated and expansion sections, use the expansions first!
- USB 3.0 Ports – These will likely be the most common port on your PC, these are used to plug in a multitude of devices such as Keyboards, Mice, External Hard Drives and Printers. The 3.0 standard (blue) is considerably faster than the older 2.0 standard (black) so plug things that need a faster connection, such as gaming peripherals and external hard drives, into one of these blue 3.0 ports.
- PS/2 Ports – These are almost redundant nowadays, but if you do have an old mouse or keyboard that have a PS/2 connector this is where you'll want to plug it in.
- VGA Port – This is the integrated graphics VGA port. This port is usually disabled if the system has a dedicated graphics card (see point 9).
- HDMI Port - This is the integrated graphics HDMI port. This port is usually disabled if the system has a dedicated graphics card (see point 9).
- USB 2.0 Ports - These will likely be the most common port on your PC, these are used to plug in a multitude of devices such as Keyboards, Mice, External Hard Drives and Printers.
- USB 3.0 Ports – These will likely be the most common port on your PC, these are used to plug in a multitude of devices such as Keyboards, Mice, External Hard Drives and Printers. The 3.0 standard (blue) is considerably faster than the older 2.0 standard (black) so plug things that need a faster connection, such as gaming peripherals and external hard drives, into one of these blue 3.0 ports.
- LAN Ports – Used for RJ45 network connections, this port is where you’ll connect an Ethernet cable from your router in order to connect to the internet.
- Audio Ports – 3.5mm Audio Devices can be connected here, the green port is for headphones, pink for microphones and blue is a line input for incoming audio signals. If your system has an External Sound Card (point 14), use those ports instead of these ones.
- Dedicated Graphics Card - Almost all of our systems will have one of these. If you have a dedicated graphics card, make sure you are plugging your monitor into this, and not the display output ports above (points 3 and 4). What port you plug your monitor(s) into depends on your monitor input. If you have ordered a monitor from us then it will either come with supplied cabling or adaptor, so check your document wallet. VGA monitors are still fairly common so if your graphics card does not have a VGA port (many don’t) then you will want to use something like an HDMI to VGA adaptor which are readily available and won’t break the bank. We sometimes include these adaptors free of charge in with your document wallet, but do not sell or supply them.
- DisplayPort(s) – Part of the Dedicated Graphics Card (point 9), a DisplayPort is the most modern type of display output connector seen on Gaming PCs. These ports should be used if you have a fancy high end gaming monitor, if the monitor also has a DisplayPort of course.
- HDMI Port(s) – Part of the Dedicated Graphics Card (point 9), an HDMI port is one of the most common display output connectors. Most modern monitors will have an HDMI port.
- Wireless Network Card – This is used to connect to a wireless network. If you have ordered a wireless network card with your system then this is what they look like. In your document wallet will be an antenna or two, you will need to screw these in before trying to connect to a wireless network. If you don’t have this on the back of your PC, your PC doesn’t have Wi-Fi capabilities so you’ll need to connect an Ethernet cable to the LAN Port (point 7).
- USB 3.0 & USB Type-C Expansion Card – This is exactly what it says on the tin, an expansion card which has additional USB 3.0 and USB Type-C ports. Options are also available with just USB 2.0 Ports, and one with just USB 3.0 Ports too.
- Non-Integrated Sound Card - Always added as an addition to an integrated sound card as integrated sound cards cannot be removed. If added, the Integrated sound card will be disabled so make sure you plug your audio devices in here. Will typically have more connection options such as digital audio and are far superior to processing audio than the integrated sound cards.
- Windows License Key – If you ordered a copy of Windows from us, you will have one of these stickers displaying your 25-digit Windows License key should you ever need it. If you did not order an Operating System from us, this will not be present.
- Power Connector Port – This is where you plug in the PC using the supplied 3-Pin IEC C14 power cable, also known as a Kettle Lead. Depending on the system ordered you will usually find it loose inside the outer cardboard box, in a cable bag with spare cables. If you have more than one box, check the other boxes. Make sure the connector is pushed in all the way, it may require some force. Be sure to run this cable via a good quality surge protector and not directly from the wall.
- Main Power Switch – This will need to be switched to the on position in order for the PC to be operational, do not use this switch to turn off the PC while it is on, ensure the PC has properly shut down before turning it off here.
FRONT CASE CONNECTIONS
- Reset Button – A button for resetting your PC. Nearly always smaller than the power button and often harder to depress to stop you accidentally restarting your PC. They are also sometimes used for controlling case lighting.
- USB 2.0 Port(s) – Exactly the same as the rear USB 2.0 ports just in a more convenient location. UKGC can only connect up USB 2.0 ports if a USB 2.0 header exists on the motherboard and case. If your USB 2.0 port(s) does not work then it will be because the headers do not exist, or more likely, are populated with things like card readers, extra ports and certain other expansion cards.
- USB 3.0 Port(s) – Exactly the same as the rear USB 3.0 ports just in a more convenient location. UKGC can only connect up USB 3.0 ports if a USB 3.0 header exists on the motherboard and case. If your USB 3.0 port(s) does not work then it will be because the headers do not exist, or more likely, are populated with things like card readers, extra ports and certain other expansion cards.
- USB Type-C Port(s) – Exactly the same as the rear USB Type-C ports just in a more convenient location. UKGC can only connect up USB Type-C ports if a Type-C header exists on the motherboard ordered. If your USB Type-C port does not work then it will be because the header does not exist on your motherboard, or is in use by something more important.
- Front Audio Ports - Once again, convenient located ports the same spec as the ports on the rear of the PC. They usually only consist of 1 x audio out (headphone or speakers) and 1 x audio in (mic) so its normally always best to use the rear sound card ports. On some cases there will only be one audio port on the front of the PC, check your document wallet for a splitter!
- Power Button – No awards for guessing what this one does! Turns your PC on and off.
3 – POWER ON EXPECATIONS
Now you’ve got the PC set up, you’re almost ready to go! If you’re not too familiar with PCs, this section will let you know exactly what should happen when you hit that power button!
- Fans – All the fans will turn on, sometimes they will be loud when the PC is first turned on, don’t worry, they will quieten down!
- Lights – Any lights in the PC will turn on, including the power button, hard drive activity light and any RGB fans or strips present in the PC.
- Beeps – Your PC will have a diagnostics speaker built in to it, this is used to output beep codes that can be used to diagnose issues. If everything is good, you will get one single, short beep before you get any display on your monitor. If you get a 1 long, 3 short beep code following the first single beep, check the connection to your monitor, making sure it’s plugged in to the dedicated graphics card if you have one!
- Display – After these three things have happened, you will get some kind of display. What you see on the screen will be different, determined by the purchase of an Operating System or not.
- Windows Ordered – The PC will show the Windows logo, and after a short amount of time the PC will boot into the Windows Desktop, more information about this below!
- Windows not Ordered – The PC will boot into the BIOS, this is where all of the settings of the PC can be changed. We’ve optimised these settings so it’d be best to not mess around with any settings here. You will need to install an Operating System to get further than this step, you can find guides for that here.
- Windows Desktop – Once you’re booted into Windows, you’re ready to go! If your Operating System was installed by us it will have all the required drivers installed, however if you installed Windows yourself you will need to install drivers for some of the main components in the system (Motherboard, Graphics Card, Dedicated Sound Card*, Dedicated Wireless Card*, Capture Card*) *if present in your system. Take a look at your invoice and locate these components, navigate to the website for the specific component and install any drivers.
Once you’re into Windows and have all your drivers installed, you are ready to go! We recommend running a game or piece of intensive software of your choice shortly after getting it all set up, just in case the worst has happened and the PC has developed some kind of issue since leaving our offices.
FAQs
- Do you preinstall any software? – The only software we preinstall will be software required in the operation of the PC, for example the Asus Armoury Crate software which contains the software in order to control RGB lighting. If possible, we will preinstall any ordered software.
- Should I keep my packaging? – Yes! The packaging is important should you ever need to send the PC back to us, as it is moulded around the dimensions of your specific case. We aren’t able to send out any PCs that aren’t in original packaging, so if you send us a PC in different packaging you would have to arrange your own collection.
- Where should I place my PC? – You ideally want to place your PC on a hard surface such as a desk or cabinet, we recommend avoiding carpet as this can cause considerable amounts of dust to be sucked up into the PC. You also want to make sure there is plenty of space around all sides of the PC to ensure sufficient airflow is provided.
- What are these extra cables? – Keep hold of these! We supply any extra cables that come with the components so you have them should you want to upgrade the PC in the future.
- What should I do to look after my PC? – Keeping on top of the dust and keeping it all updated is all you should have to do; we’ve got a guide explaining in full how to do this, you can find it here.
- I can’t see my WI-FI?! – Firstly, take a look at your invoice and make sure you ordered a Wireless card, or a motherboard that has one built in. If you did order one, check the clear document wallet for the wireless antenna, these will need to be screwed in to the brass threads on the rear of the PC.
- What is this A4 wallet for? – We put all of the documentation, and any important spare screws or components in this wallet should you ever require them, we recommend keeping this wallet safe! Don’t panic if you’re seeing all the discs but realise you don’t have a disc drive, everything on them is available online.
- How do I control my RGB lights? – There are a few different ways your RGB might be controller, it will be either through software such as Asus AURA or Corsair iCUE, through a remote which you would find in your clear A4 document wallet, or via either a dedicated light, or reset button on the front of the case.
- Do you offer an upgrade service? - Absolutely, UK Gaming Computers are not just a supplier of Custom PCs, we are here to support you all the way through your ownership of your UKGC PC and offer an upgrade service. This service can advise you on the best route for upgrades specifically for your system as well as us doing the upgrade for you. You can check out more information here.