
A Failing hard disk can cause a number of problems for custom built computers such as software blue screening (BSOD), odd software behaviour, data loss or even stopping the system from booting.
Thankfully, it’s a relatively easy task to diagnose. This guide will show you how.
1 – Get the software
As UK Gaming Computers generally uses Seagate hard disks we recommend the official Seagate tool, Seatools.
Seatools is a fantastic program the scans your hard disk for errors, it can even correct hard disk errors. It is also not limited to just testing Seagate hard disks; it will also test SSD’s such as Corsair, Samsung, Kingston and other hard disk brands like Western Digital.
There are two versions of Seatools, "Seatools bootable" and "Seatools for Windows". Seatools bootable is the version we recommend as it is not dependant on a windows Operating system to function. You may not be able to boot to windows for example which would render the Windows version about as useful as an ashtray on a motorbike!
Either way, both versions can be found here: https://www.seagate.com/gb/en/support/downloads/seatools/
2 – Get it going
Seatools is quite a small file (A few MB) so it won’t take long to download. If you are using the Windows version simply install it like you would and other program.
If you are using the bootable version you simply insert a blank USB stick and run the installer to make the bootable USB stick and then insert it to the PC in question/reboot and Seatools bootable should then start.
Provided your system is set to boot from the USB port your PC may display a message, when booting, to ‘push any key to boot from CD/DVD’ simply push any key and Seatools will begin to load. On some systems Seatools may start on its own and you won’t need to push anything. If Seatools does not start, or give you prompt, and the system boots as normal then make sure your first boot device is correctly set in your BIOS. Your motherboard manual will show you how to correctly set this.
A Licence agreement will load, simply click accept.
3 - The testing
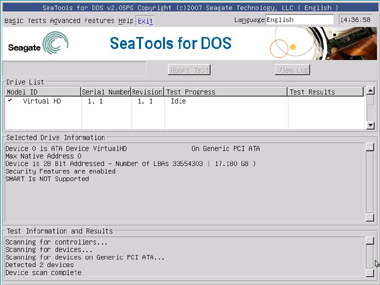
You should now see something that looks the same as above. It’s the top table you are interested in. In the ‘Model ID’ column you should see any hard disks that are connected to your system, simply highlight the disk you wish to test and then in the menu at the top click BASIC TESTS and then select LONG TEST. This will then begin the long test which will then find, and repair, any bad sectors of the hard disk.
This is a non destructive test which means it should not erase any data on the hard disk however we do recommend you backup your data if possible, just in case.
The progress bar will then start to fill up and you may hear plenty of hard disk activity. The long test can take anywhere between half an hour to several hours to run, depending on how big your hard disk is, so you may wish to leave it for a while. When the test finishes a result will display in the test results column;
Pass – Your hard disk is functioning normally and there is nothing wrong with it.
Fail – There is a fault on the hard disk and we recommend that it is replaced
There is also other information displayed in the ‘Selected Drive information’ area. If you plan on seeking a manufacturer’s warranty replacement directly with Seagate then you will find a Seagate error code in this section. You may wish to make a note of this code and pass it onto Seagate when you raise a RMA/Warranty request/tech support query with them.
To finish, just hit the exit button.