
If you have two Hard Drives and have an Operating System on one, the Second Hard Drive will need activating within Windows in order for you to be able to access and use the drive. This quick guide will walk you through all the steps to get your Second Hard Drive activated!
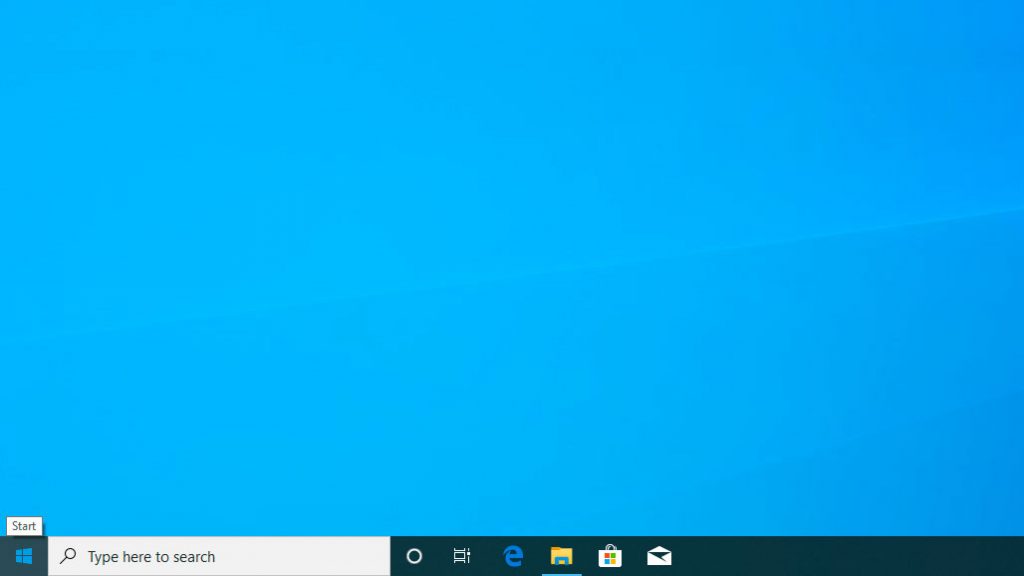
1 - First you will need to drag you cursor so that it is positioned over the start button in the bottom left side of your screen as shown below.
 2 - After you have positioned your cursor, you need to right click. A menu should appear over the start button like the image below.
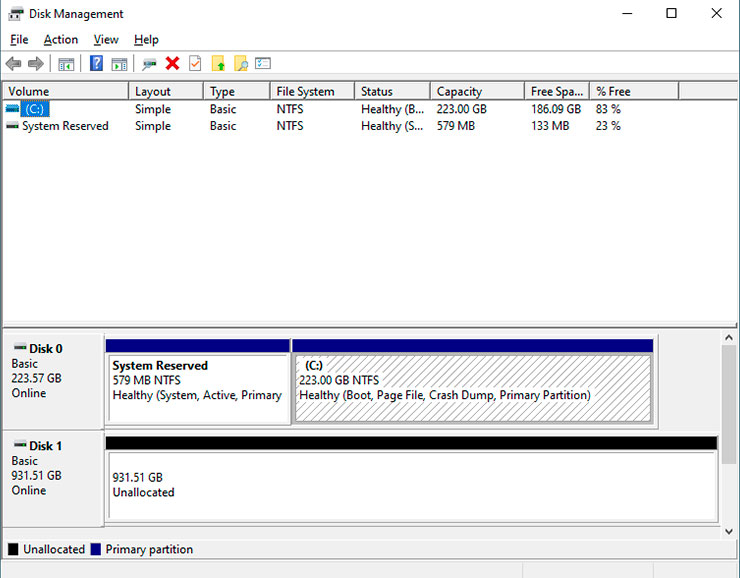
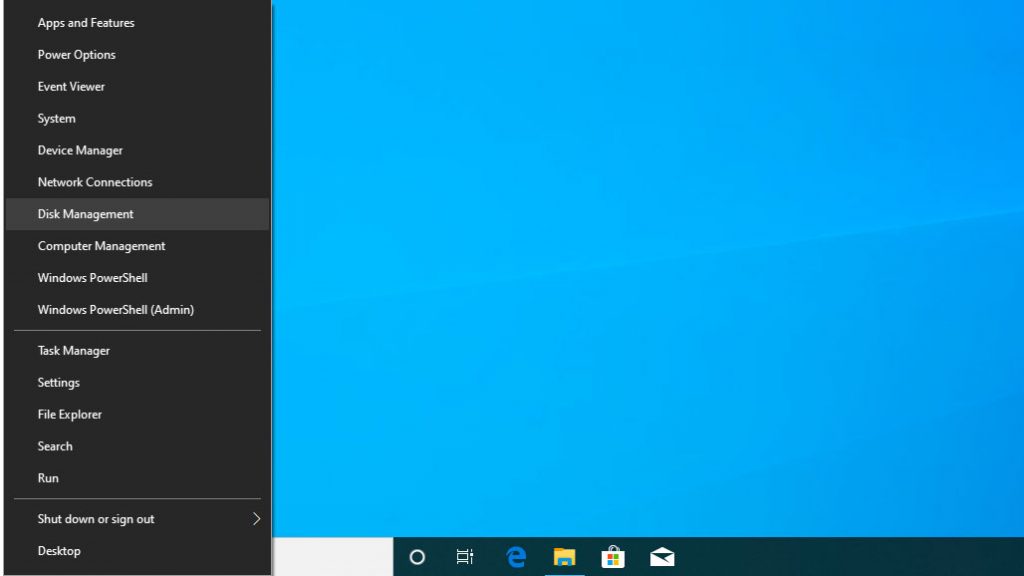 3 - When this menu appears, click where it says "Disk Management". A window should pop up. This window shows you all the formatted drives (the ones that you can access and store data on currently) at the top and all of your connected drives at the bottom. If you have a second, inactivated drive, then you will see a box at the bottom of the window that will have a black bar across the top of it, if there is a blue car then your drive has already been activated and should be recognised within Windows.
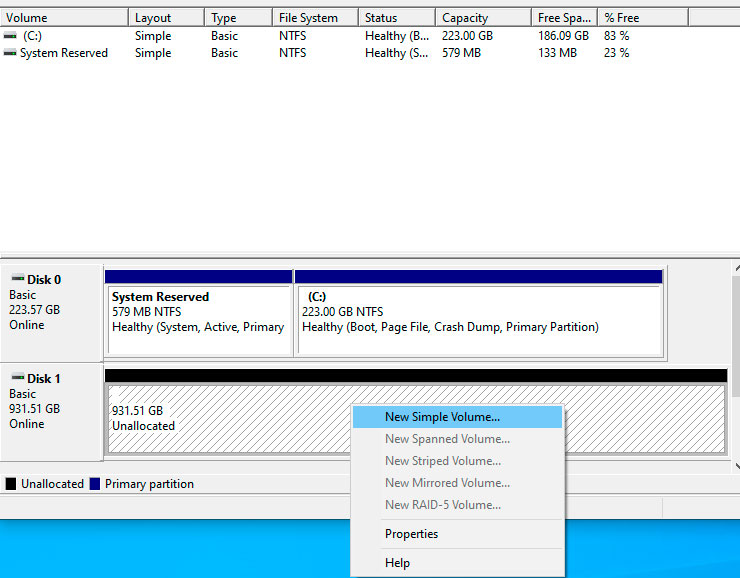
 4 - After locating the drive that has not yet been activated, you will then need to right click the box and another list will appear with different options. You will then have to click the first option which should say "New Simple Volume".
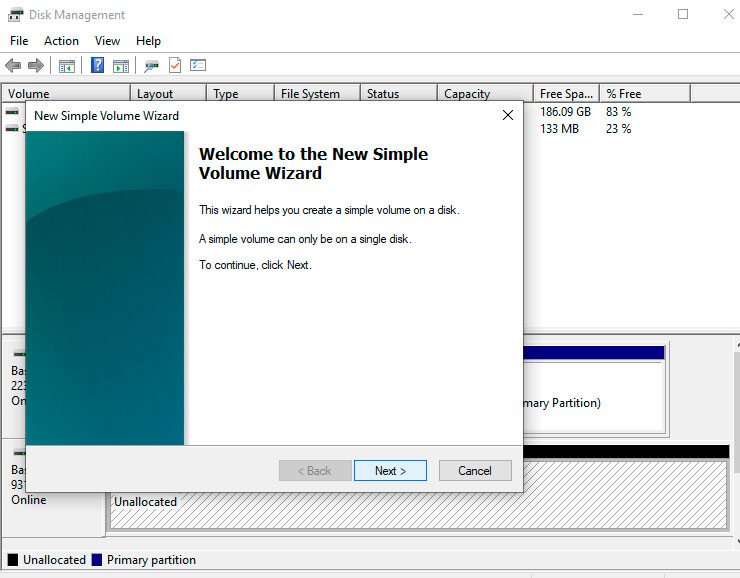
 5 - After clicking the "New Simple Volume" button, another window will open. This window should be called the "New Simple Volume Wizard" and it will take you through the final steps for you to activate your drive. Click the next button to continue setting up your drive.
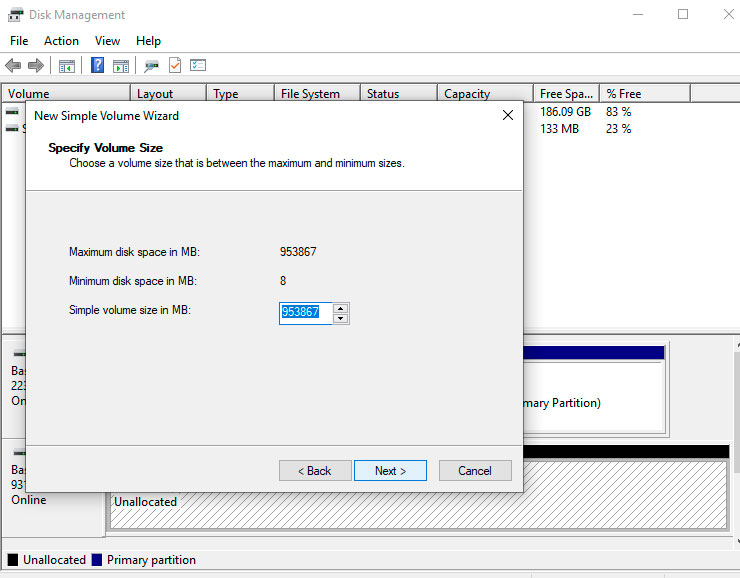
 6 - Next you will be presented with a screen that will ask how big you want the "Volume Size" to be, this simply means how much of the drive you are able to use. There should already be a value in the next box that is the same as the maximum space you can use which is noted above, if not change the bottom number to match the top number and click next.
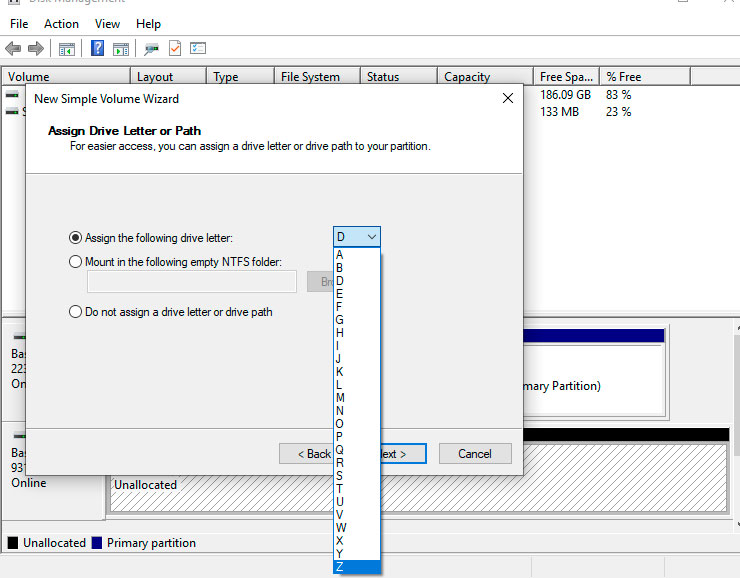
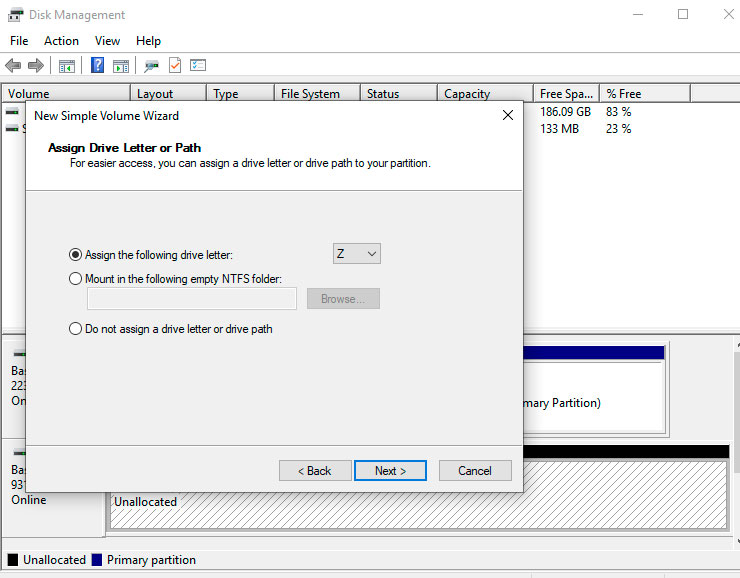
 7 - After confirming the size of your new volume you will then get to choose what letter your drive will be assigned with. By clicking the drop down arrow you will be presented with a list of all the possible letters that you can choose, excluding ones that have already been assigned such as the "C" drive. For our example we will assign it the letter "Z".
 8 - After selecting your desired letter, continue the process by clicking "Next".
 9 - You will now be presented with a screen that will allow you to choose the name of your drive. By default this name is set to "New Volume" however to change this you simply have to type your desired name into the textbox.
 10 - For our example we will set the volume label to "DATA".
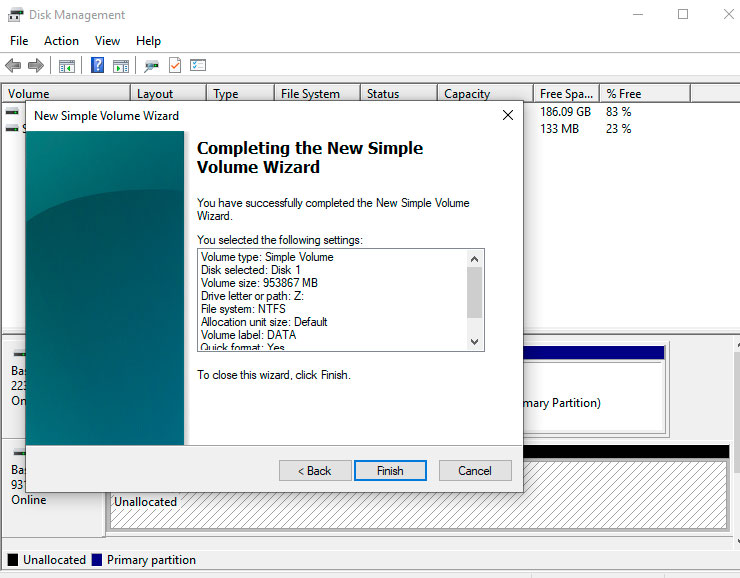
 11 - Now that you have chosen both the name and the letter of your drive, you should now be presented with a window that will allow you to finish the process. After clicking this button the setup wizard will close and you will be left on the disk management screen once again.
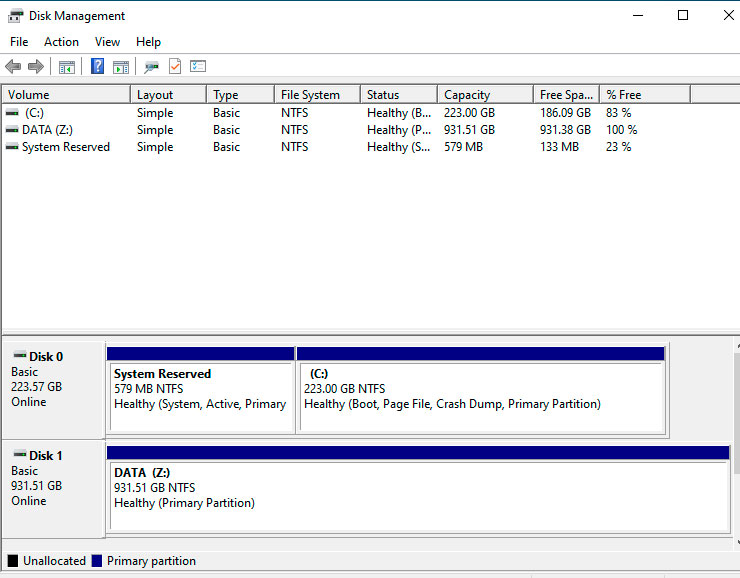
 12 - The computer will then start to format the drive so that you can store data on it. Make sure that you do not close the disk management window until the drive has finished being formatted. You can tell when the drive is still formatting because you see that it says "Formatting" on one of the drives. Once this text has disappeared you should then note that the drive that you just formatted will have the letter and the name you chose on it as well as having a blue box above it instead of a black one.
You will also see that your drive has appeared at the top of the screen as well. At the top it will show all of your drive, how much total storage space each of them have, and how much free space they have. Don’t worry if your drive is being displayed as having less storage than it claims to have as this is completely normal as some of this space is reserved. For example the drive that we used has 1TB but it is being displayed as having 931.51GB.
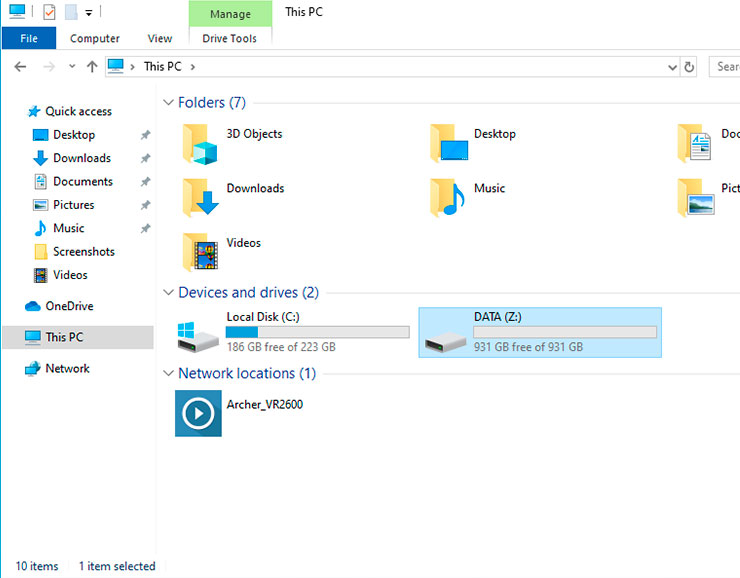
Now when you open file explorer and click on the “This PC” option on the side of the window, you will see your new drive available for you to store your files on.
12 - The computer will then start to format the drive so that you can store data on it. Make sure that you do not close the disk management window until the drive has finished being formatted. You can tell when the drive is still formatting because you see that it says "Formatting" on one of the drives. Once this text has disappeared you should then note that the drive that you just formatted will have the letter and the name you chose on it as well as having a blue box above it instead of a black one.
You will also see that your drive has appeared at the top of the screen as well. At the top it will show all of your drive, how much total storage space each of them have, and how much free space they have. Don’t worry if your drive is being displayed as having less storage than it claims to have as this is completely normal as some of this space is reserved. For example the drive that we used has 1TB but it is being displayed as having 931.51GB.
Now when you open file explorer and click on the “This PC” option on the side of the window, you will see your new drive available for you to store your files on.
 13 - Congratulations, you have now successfully activated your second drive!
2 - After you have positioned your cursor, you need to right click. A menu should appear over the start button like the image below.
3 - When this menu appears, click where it says "Disk Management". A window should pop up. This window shows you all the formatted drives (the ones that you can access and store data on currently) at the top and all of your connected drives at the bottom. If you have a second, inactivated drive, then you will see a box at the bottom of the window that will have a black bar across the top of it, if there is a blue car then your drive has already been activated and should be recognised within Windows.
4 - After locating the drive that has not yet been activated, you will then need to right click the box and another list will appear with different options. You will then have to click the first option which should say "New Simple Volume".
5 - After clicking the "New Simple Volume" button, another window will open. This window should be called the "New Simple Volume Wizard" and it will take you through the final steps for you to activate your drive. Click the next button to continue setting up your drive.
6 - Next you will be presented with a screen that will ask how big you want the "Volume Size" to be, this simply means how much of the drive you are able to use. There should already be a value in the next box that is the same as the maximum space you can use which is noted above, if not change the bottom number to match the top number and click next.
7 - After confirming the size of your new volume you will then get to choose what letter your drive will be assigned with. By clicking the drop down arrow you will be presented with a list of all the possible letters that you can choose, excluding ones that have already been assigned such as the "C" drive. For our example we will assign it the letter "Z".
8 - After selecting your desired letter, continue the process by clicking "Next".
9 - You will now be presented with a screen that will allow you to choose the name of your drive. By default this name is set to "New Volume" however to change this you simply have to type your desired name into the textbox.
10 - For our example we will set the volume label to "DATA".
11 - Now that you have chosen both the name and the letter of your drive, you should now be presented with a window that will allow you to finish the process. After clicking this button the setup wizard will close and you will be left on the disk management screen once again.
12 - The computer will then start to format the drive so that you can store data on it. Make sure that you do not close the disk management window until the drive has finished being formatted. You can tell when the drive is still formatting because you see that it says "Formatting" on one of the drives. Once this text has disappeared you should then note that the drive that you just formatted will have the letter and the name you chose on it as well as having a blue box above it instead of a black one.
You will also see that your drive has appeared at the top of the screen as well. At the top it will show all of your drive, how much total storage space each of them have, and how much free space they have. Don’t worry if your drive is being displayed as having less storage than it claims to have as this is completely normal as some of this space is reserved. For example the drive that we used has 1TB but it is being displayed as having 931.51GB.
Now when you open file explorer and click on the “This PC” option on the side of the window, you will see your new drive available for you to store your files on.
13 - Congratulations, you have now successfully activated your second drive!