1 – Only One Tool Required
Removing or installing a graphics card in a PC is quite a straightforward process, for which you only really need a Phillips/Crosshead screwdriver.
2 – Size & Power
Before we go any further though, it’s at this point that we should point out that when changing a graphics card you should always take into account whether it will actually fit into your case and then more importantly if you power supply unit (PSU) is good enough to power your new graphics card along with the rest of your PC. The last thing you want is to be left with an expensive paperweight if your new graphics card doesn’t fit, or even worse if your cheap PSU ends up destroying the nice new piece of kit.
We would recommend checking the manufacturer’s websites to find out the size of the graphics card you want to buy and whether it will fit in your case. However, for the PSU, you’re best off checking out our detailed power supply guide as this explains all you need to know about PSUs and will help you work out if you have enough juice for your new graphics card. You should also check that your PSU has the required PCIE power leads for your graphics card, if it requires them, again the manufacturer’s website can fill you in with this information.
3 – Protecting Your PC
Finally as with any time you are working on the inside of a PC, you need to look out for the hazard of static electricity, which can easily cause damage to computer components, therefore it is always important to protect your PC from static whenever you go into it. To do this you can simply ground yourself by touching something metal with a clear ground path such as a radiator, before you go into the PC. If you feel the need you can purchase an antistatic wrist strap. It’s also important to note that you ideally don’t want to be standing on a carpeted surface when working on a PC either however it is not the end of the world if this is not practical.
4 – Getting Started
Now that you are ready to swap out your graphics card, you need to start by turning off the PC and unplugging the power and any cables from the existing graphics card at the back of the PC. You can then remove the side panel, which will usually be the left hand panel when facing the PC. Depending on the type of case you may find the side panel is held in place by a couple of screws at the back of the PC. You should refer to your case manufacturer’s manual for specific instructions on removing the side panel.

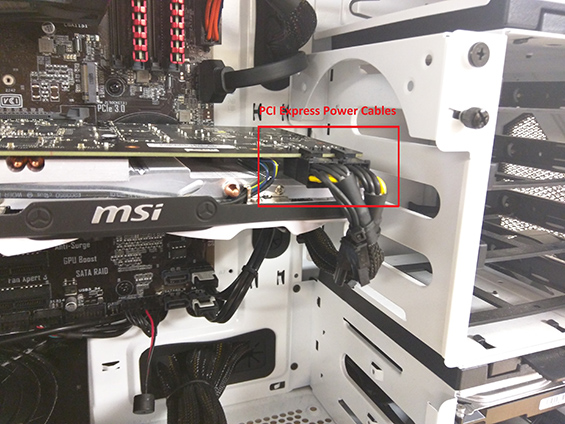
Once remove you should clearly see the graphics card attached to the motherboard, in a PCI-Express slot, normally this would be one of the slots at the top of the motherboard and should be close to the processor cooler. If it has them, you should also remove the PCI Express power cables plugged into the graphics card - not all graphics cards require these additional power cables, this is usually easier to do before you unscrew/unattached the graphics card from the PC. To remove them a simple squeeze on the locking latches and a light pull away from the graphics card should be all it takes – A light wiggle may help.
5 – Removing the Graphics Card
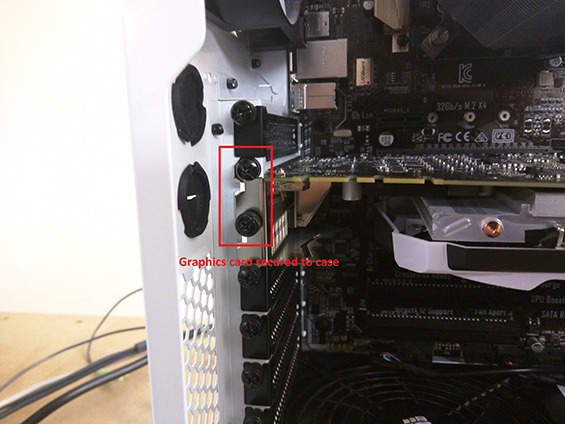
Cases can have various different ways of securing the graphics card in place, again you’ll find that the case manufacturer’s manual is there to help if you need it. Generally the graphics card will be held in place by a couple of screws where it is attached to the case at the back of the PC, you will need to unscrew these to then remove the graphics card.
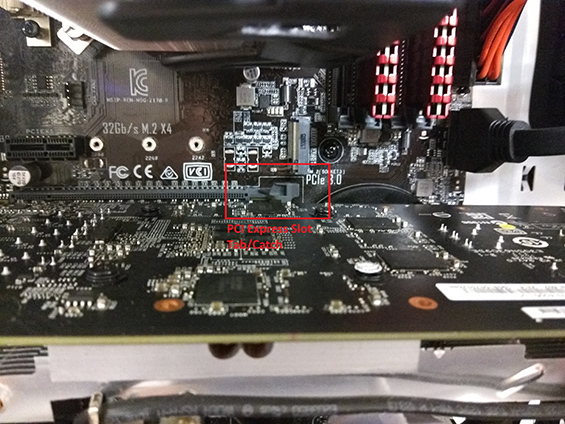
Finally the graphics card will be held in the PCI Express slot by a Tab or Catch at the end of the slot on the right. In most cases this will simply need to be pressed down until the graphics card can be slid out of the PCI Express slot however pay close attention to the tab mechanism as some may need moving in a different direction. In some cases, especially if you have a large aftermarket processor cooler, you may need to use a long screwdriver to reach the Tab/Catch so that you can push it down to release the graphics card.
6 – Installing a Graphics Card
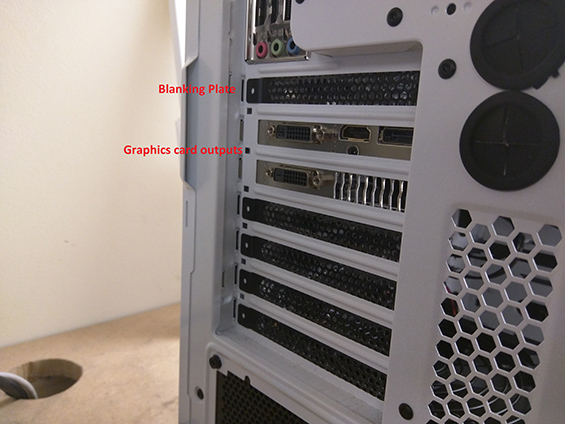
The process of installing a graphics card is pretty much the exact opposite of the process above to remove the graphics card, though it may involve a few extra steps, especially if you are adding a second graphics card or more. First you need to turn the PC off and unplug the power lead, if you have not already done so. You should also follow the same process to protect the PC from static electricity, this should be done before you even remove the new graphics card from its protective packaging. Remove the side panel from the PC and check what PCI Express slot you need to fit the graphics card too, this can be checked using the motherboard manufacturers manual and can be very important when setting up a multi graphics card system. Check around the back of the PC where the PCI Express slot that you will be fitting the graphics to is, you will need to remove any blanking plates at the back were the graphics card outputs will be, these will usually be screwed in place, but again the case manufacturers manual will explain how these are removed if it is not clear.
Before fitting the graphics card remember to remove any plastic covers from the graphics card or even from the PCI Express slot you are fitting it too – they are becoming more and more common however you may not have these. Slot the graphics card into the selected PCI Express slot, and push down using firm pressure. Once in place the Tab/Catch at the back of the PCI Express slot should automatically lock into place and hold the graphics card in. A light wiggle maybe needed and you may need to assist the tab/catch to help it move and lock into place at the same time you are pushing the graphics card home.
Screw in the graphics card into place at the back of the PC where the blanking plates have been removed and plug in the necessary PCI Express power leads if required. If setting up a multi graphics card system, you may also need to attach an SLI or Crossfire bridge depending on the graphics cards used.
You can then put the side panel back onto the PC and plug everything back in.
You may need to uninstall your old graphics card drivers and install your new graphics card drivers if you are changing between graphics card type. E.g. AMD to Nvidia and vice versa.
Users of multi graphics card systems will also need to enable SLI or Crossfire in the graphics cards control panel.
Finally you will want to test your new set up to make sure the new graphics card is function properly, an easy way to do this is to follow our guide for How to Test Your Graphics Card.