Over the past few months we have written a load of different articles on as bunch of different air coolers, from the likes of CoolerMaster and Noctua. All of these articles were in anticipation for this article where we will be comparing all of the air coolers we tested against each other.
Before we get going with the article, we'd like to thank CoolerMaster, Noctua and be quiet! for sending over the review samples of the coolers, without them we wouldn't be able to do stuff like this!
Right, lets get started. Here is a list of all the coolers we will be comparing:
CoolerMaster Hyper 411R
CoolerMaster Hyper 212 EVO
CoolerMaster MA410P
be quiet! Pure Rock
be quiet! Dark Rock Pro 4
Noctua NH-U12S
Noctua NH-D15
All the links above link directly to our specific reviews which contain more specific information and data, expanding on the points we mention in this article.
We will me making several different comparisons between all the air coolers in the article, specifically performance, aesthetics, fans, mounting and noise levels.
 Noctua NH-U12S
Now this is one of the coolers that don't quite make it into the "good looking" list of air coolers. When making this cooler we're sure Noctua didn't really worry about how it looked. The fan that comes with the cooler is in Noctua's signature two tone brown colour scheme. Overall the aesthetic isn't bad, we like the no thrills look of the tower with the exposed heatpipes, it's really just the fan that ruins it for us, throw one of Noctua's Chromax or Redux range and you've got something that looks great!
We'd like to write a little more about the Chromax range of products from Noctua mentioned above as these offer upgrades to the U12S that make it look much nicer. The main one being a cover that goes over the top to hide the top plate and exposed heat pipes, these do look very good and come in many colours and designs so finding one that fits your colour scheme won’t be a problem! The Chromax line also has all black fans and different coloured anti-vibration tabs for those fans, so with a bit more money invested you can make the U12S look very good!
Noctua NH-D15
Once again, like the NH-U12S this cooler has all the same aesthetic traits including the no thrills performance oriented design, and the somewhat infamous brown fan. Also like the U12S, there is fortunately the option to customise it with the Chromax range of products. There's also talk of Noctua offering full black models of their cooler in the near future which we can't wait for!
CoolerMaster Hyper 212 EVO
Much like the Noctua coolers, the aesthetics of the Hyper 212 EVO aren't really too important, it's a very basic looking cooler without any fancy covers or even fancier RGB fans, it's just a simple air cooler with aluminium fins, copper heatpipes and a fan. One design element that does add to the aesthetics is the embossed CoolerMaster logo on the top fin,which does look good. Also, unlike a certain other manufacturer, the fan is black and does look quite good. Other than that there isn't much else to say, it's a fairly industrial looking cooler with an unoffensive design so should fit in with most builds.
be quiet! Pure Rock
The Pure Rock really hits it out of the park when it comes to looks, the top of the cooler really steals the show with its brushed aluminium top fin, heat pipe caps and the be quiet! logo and grooves cut out of the top fin. The fan also looks very good with the all black design that be quiet! is known for. Compared to other coolers in this price bracket, we’d say this is the best looking of them all. No it doesn’t have addressable RGB fans or coloured heatsink covers but the look it does have makes it look like a premium product, and we're sure that's exactly what be quiet! were trying to achieve when designing this cooler.
CoolerMaster Hyper 411R
The CoolerMaster Hyper 411R does not do a bad job when it comes to aesthetics, no it doesn't have a fancy black coating, addressable RGB fans or a brushed aluminium top but what can you expect from a cooler that costs less than £20. What it does have is a stamped CoolerMaster logo on the top fin, also with a stamped design that compliment the angles of the heatsink.
The included fan is all black with translucent blades in order to make the four white LEDs more vivid, the fan is the only part of the aesthetics that I'd like to see changed, the only sort of illumination you get is four lines of light from the LEDs to the centre of the cooler, it doesn't really look that great. There's also no way to turn off the LEDs unless you want to de-solder them.
CoolerMaster Hyper MA410P
The MA410P is a very good looking CPU cooler, the top fin is black instead of the regular raw aluminium which does make it look much better, this fin also has an embossed CoolerMaster logo. Obviously the main aesthetic point is the RGB fan, it isn't the best lighting from a fan we've seen, but the best that comes on a fairly well priced air cooler. The fan has LEDs in the centre which illuminate the entirety of the clear blade. The fan terminates in a regular RGB header so you have the option of connecting it to either the included controller, or directly into the motherboard which is a nice feature that some other manufacturers fail to accommodate.
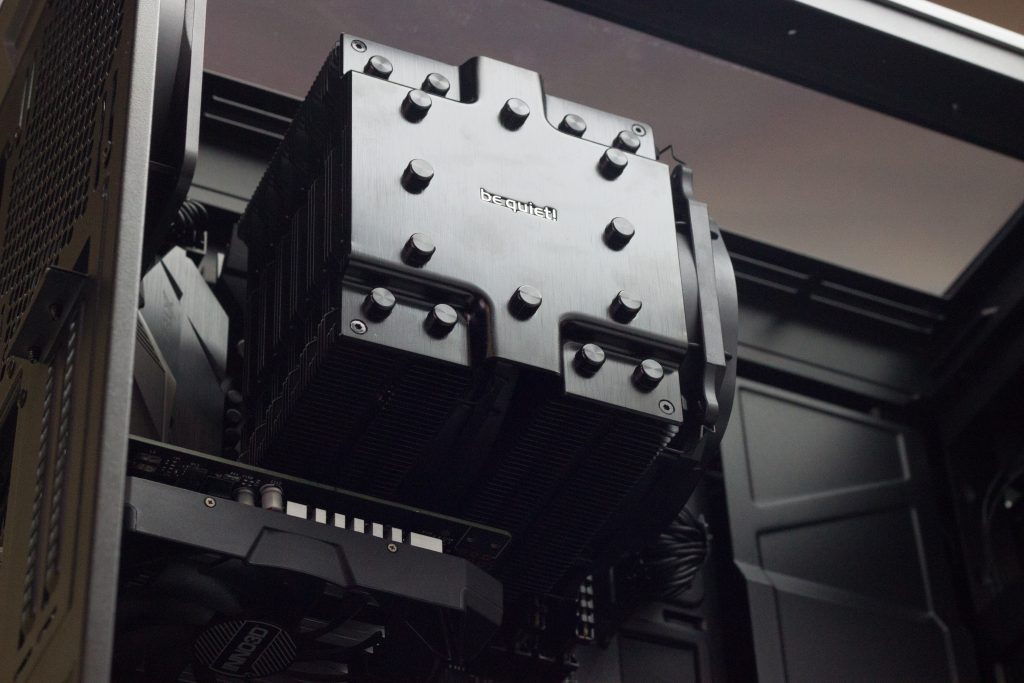
be quiet! Dark Rock Pro 4
Wait what? We're putting a cooler without RGB at the top of the aesthetics list? You might think we've gone insane by not embracing the RGB overlords, but hear us out.
The Dark Rock Pro 4 is a very very good looking cooler, in our opinion it's the best looking dual-tower design cooler you can buy. The cooler comes with a black coating on all of the fins which helps with it's good looks, now this coating looks like it would negatively affect performance but it actually does the complete opposite, this coating contains specially developed ceramic particles that aid in the exchange of heat from the aluminium fin to the air, something really clever that be quiet! have developed!
We really like the top plate on the Dark Rock Pro 4 as it has a few different things that improve the look of the cooler, the first being the top plate itself which is a nice black brushed aluminium piece that covers the heatsinks perfectly. There are also heatpipe caps mounted to this plate, this really improves the look of the coolers too. Finally, instead of having holes to fit a screwdriver through the plate in order to mount the cooler, there are cleverly designed covers that look the same as the heatpipe caps that simply screw out allowing for easy installation.
The fans only add to the great looks of the Dark Rock Pro 4, the all black design with the simple be quiet! logo complement the colours of the rest of the cooler, the fan cables are also braided with black connectors to keep with the stealthy black aesthetic. When it comes down to the aesthetics, there is really nothing that we would change with the Dark Rock Pro 4.
Noctua NH-U12S
Now this is one of the coolers that don't quite make it into the "good looking" list of air coolers. When making this cooler we're sure Noctua didn't really worry about how it looked. The fan that comes with the cooler is in Noctua's signature two tone brown colour scheme. Overall the aesthetic isn't bad, we like the no thrills look of the tower with the exposed heatpipes, it's really just the fan that ruins it for us, throw one of Noctua's Chromax or Redux range and you've got something that looks great!
We'd like to write a little more about the Chromax range of products from Noctua mentioned above as these offer upgrades to the U12S that make it look much nicer. The main one being a cover that goes over the top to hide the top plate and exposed heat pipes, these do look very good and come in many colours and designs so finding one that fits your colour scheme won’t be a problem! The Chromax line also has all black fans and different coloured anti-vibration tabs for those fans, so with a bit more money invested you can make the U12S look very good!
Noctua NH-D15
Once again, like the NH-U12S this cooler has all the same aesthetic traits including the no thrills performance oriented design, and the somewhat infamous brown fan. Also like the U12S, there is fortunately the option to customise it with the Chromax range of products. There's also talk of Noctua offering full black models of their cooler in the near future which we can't wait for!
CoolerMaster Hyper 212 EVO
Much like the Noctua coolers, the aesthetics of the Hyper 212 EVO aren't really too important, it's a very basic looking cooler without any fancy covers or even fancier RGB fans, it's just a simple air cooler with aluminium fins, copper heatpipes and a fan. One design element that does add to the aesthetics is the embossed CoolerMaster logo on the top fin,which does look good. Also, unlike a certain other manufacturer, the fan is black and does look quite good. Other than that there isn't much else to say, it's a fairly industrial looking cooler with an unoffensive design so should fit in with most builds.
be quiet! Pure Rock
The Pure Rock really hits it out of the park when it comes to looks, the top of the cooler really steals the show with its brushed aluminium top fin, heat pipe caps and the be quiet! logo and grooves cut out of the top fin. The fan also looks very good with the all black design that be quiet! is known for. Compared to other coolers in this price bracket, we’d say this is the best looking of them all. No it doesn’t have addressable RGB fans or coloured heatsink covers but the look it does have makes it look like a premium product, and we're sure that's exactly what be quiet! were trying to achieve when designing this cooler.
CoolerMaster Hyper 411R
The CoolerMaster Hyper 411R does not do a bad job when it comes to aesthetics, no it doesn't have a fancy black coating, addressable RGB fans or a brushed aluminium top but what can you expect from a cooler that costs less than £20. What it does have is a stamped CoolerMaster logo on the top fin, also with a stamped design that compliment the angles of the heatsink.
The included fan is all black with translucent blades in order to make the four white LEDs more vivid, the fan is the only part of the aesthetics that I'd like to see changed, the only sort of illumination you get is four lines of light from the LEDs to the centre of the cooler, it doesn't really look that great. There's also no way to turn off the LEDs unless you want to de-solder them.
CoolerMaster Hyper MA410P
The MA410P is a very good looking CPU cooler, the top fin is black instead of the regular raw aluminium which does make it look much better, this fin also has an embossed CoolerMaster logo. Obviously the main aesthetic point is the RGB fan, it isn't the best lighting from a fan we've seen, but the best that comes on a fairly well priced air cooler. The fan has LEDs in the centre which illuminate the entirety of the clear blade. The fan terminates in a regular RGB header so you have the option of connecting it to either the included controller, or directly into the motherboard which is a nice feature that some other manufacturers fail to accommodate.
be quiet! Dark Rock Pro 4
Wait what? We're putting a cooler without RGB at the top of the aesthetics list? You might think we've gone insane by not embracing the RGB overlords, but hear us out.
The Dark Rock Pro 4 is a very very good looking cooler, in our opinion it's the best looking dual-tower design cooler you can buy. The cooler comes with a black coating on all of the fins which helps with it's good looks, now this coating looks like it would negatively affect performance but it actually does the complete opposite, this coating contains specially developed ceramic particles that aid in the exchange of heat from the aluminium fin to the air, something really clever that be quiet! have developed!
We really like the top plate on the Dark Rock Pro 4 as it has a few different things that improve the look of the cooler, the first being the top plate itself which is a nice black brushed aluminium piece that covers the heatsinks perfectly. There are also heatpipe caps mounted to this plate, this really improves the look of the coolers too. Finally, instead of having holes to fit a screwdriver through the plate in order to mount the cooler, there are cleverly designed covers that look the same as the heatpipe caps that simply screw out allowing for easy installation.
The fans only add to the great looks of the Dark Rock Pro 4, the all black design with the simple be quiet! logo complement the colours of the rest of the cooler, the fan cables are also braided with black connectors to keep with the stealthy black aesthetic. When it comes down to the aesthetics, there is really nothing that we would change with the Dark Rock Pro 4.
 CoolerMaster Hyper 411R
Mounting the CoolerMaster Hyper 411R is very easy, it can be done in three simple steps. First you screw the specific piece to the cooler, depending on what cooler you're using. Then you prepare the backplate with the threaded screws that pass through the motherboard. Lastly, put a bit of the included thermal compound on the CPU and screw the two together. Mounting the fan is even easier, simply slide the fan with the pre-installed mounting over the heatsink into the grooves and you're done.
CoolerMaster Hyper 212 EVO
The mounting on the Coolermaster Hyper 212 EVO is basically faultless, the process is very easy for all supported sockets. It is so good because of the two stage installation, stage one involves securing standoffs into the backplate, which is secure on it's own. This means that if you ever needed to remove the cooler to replace thermal compound or replace the CPU, you don't have to remove the motherboard from the case, you simply need to take off the cooler and the backplate and standoffs will stay in place. Once you have the standoffs and backplate installed it's also a very simple process for both AMD and Intel, all you need to do is line up the mounting bracket and screw down all four corners evenly until it cannot go any tighter. Once you have the cooler installed, the fan simply slides on by using the pre-installed plastic fan brackets. The cooler also includes a second set of these brackets should you ever wish to add a second fan to the other side of the cooler.
CoolerMaster MasterAir MA410P
The mounting system used for the MA410P is great, it makes the process very easy for all sockets and allows for the cooler to be very easily removed and reinstalled without removing the motherboard, whether it would be to replace a processor or reapply thermal compound. The first step is to install the backplate and standoffs to the motherboard, this is the same process with both AMD and Intel. Then, much like the CoolerMaster Hyper 212 EVO, you take the mounting bracket, slot it into the hole in the cooler and screw down all four corners evenly. Once that's all installed, the fan simply slides on, then you can connect up the CPU fan and RGB LED header and have a fancy RGB CPU cooler. The 0ne problem I have with the mounting is that it doesn't come with a socket to easily screw in the backplate and base mounting hardware, instead you need to do it up by hand which isn't the easiest process.
be quiet! Pure Rock
It is evident that be quiet! have put a lot of time into developing their mounting for the Pure Rock. It is very well put together and secures the cooler very well, it also manages to support all modern sockets with a small amount of hardware, unlike some coolers which have completely different hardware for each socket, however this does make it feel like it has more steps than it actually needs.
The clip that holds on the Pure Wings 120mm fan works perfectly when installing it, but when it comes to taking it off it can be tricky without damaging the cooler, would be nice to see be quiet! work out another way to do this to make it more user friendly, we like CoolerMaster’s plastic fan holders which also do a good job of containing the airflow. These clips that hold on the fan are good in the fact that they make it very easy to move the fan up and down if you're working with less RAM clearance. One nice thing with the mounting is the slotted top of the standoffs to make it easier to install with a screwdriver.
be quiet! Dark Rock Pro 4
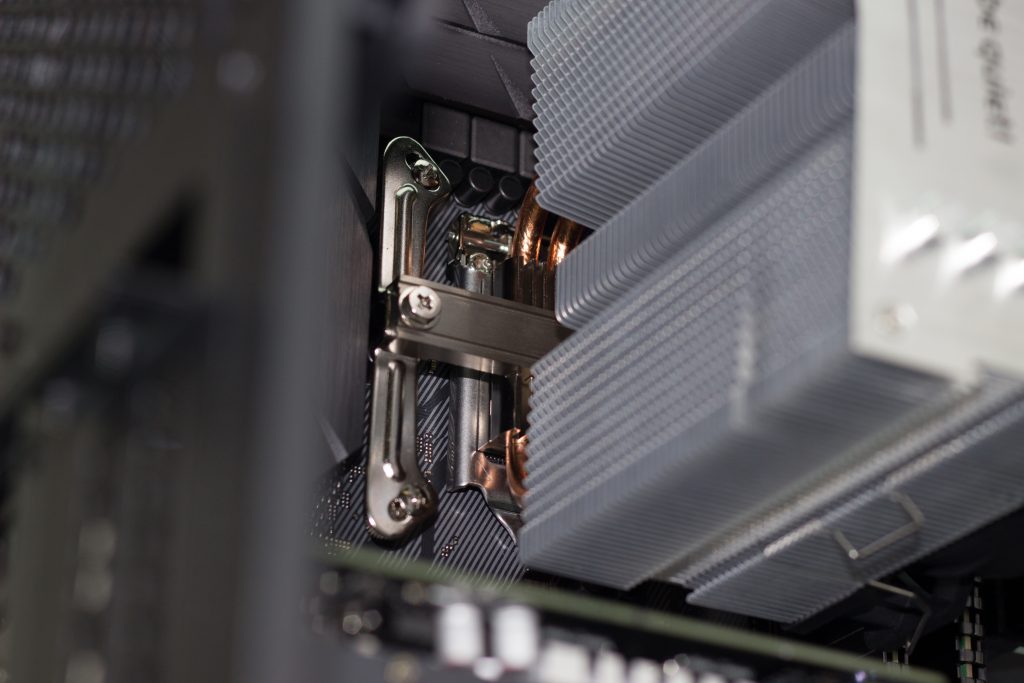
The mounting is one of the main differences the Dark Rock Pro 4 has when compared to the Dark Rock Pro 3, and we're very grateful for this as the Dark Rock Pro 3 was a nightmare to install. be quiet! have managed to support all modern sockets with as little pieces as possible, which of course cuts down costs and makes the user experience better too. It is a basic installation process, something that we don't usually see with huge dual-tower coolers so it is evident that be quiet! have put a lot of time into developing this mounting system.
One of the very nice features are the way you screw the cooler to the backplate assembly, there's two screws between the two heat sinks that normally would be very hard to get to, but the two heat pipe caps nearer to the middle of the cooler are actually fake and can be unscrewed, this reveals cutouts directly above where the cooler screws to the backplate assembly so you can easily access it, they even include a screwdriver that is the perfect length for this!
Unfortunately the mounting isn't all good, the method that be quiet! use to mount the fans to the cooler is pretty terrible. They do use the wire mounting method that many other coolers use, however they have such a small amount of slack they end up being way too tight which makes it almost impossible to install without damaging the ceramic coating or bending the heatsink fins.
Noctua NH-U12S
Noctua have really nailed the mounting of their CPU coolers with the SecuFirm2 mounting kit. Not only is the mounting very secure with almost zero flex when installed, but it's also very easy to install due to the small amount of components. The way the SecuFirm2 mounting works makes it very easy to remove and reinstall the cooler for when you want to reapply thermal compound or change your CPU, this is because instead of having most of the mounting components mount to the cooler, it mounts to the motherboard instead which equates to only having to remove four screws to get the cooler off.
Noctua NH-D15
The mounting of the NH-D15 is actually very easy, something I didn't expect coming into this review considering the sheer size of the cooler, the SecuFirm2 mounting kit really impressed me. Most of the mounting hardware is attached to the motherboard, unlike most other coolers where it is attached to the cooler, this means that you can get the majority of it installed without the huge heatsink in the way, there are only two screws you have to tighten to actually attach the heatsink to the backplate, these screws are conveniently positioned between the two heatsinks, which does require the removal of the center fan but Noctua have made sure this is very easy as it simply slides out.
The fans attach to the cooler using Noctua's classic bent piece of wire method, which does work very well but can be a bit fiddly at times, especially when trying to remove the fan.
It's also worth mentioning that the box is very well laid out, when you first open it you're greeted with with a nicely labelled box that clearly shows what pieces of hardware you need for the socket you're installing the cooler onto. These labels on top of the box also correspond to the location of the specific item inside the box too, which does make the whole mounting experience much easier.
CoolerMaster Hyper 411R
Mounting the CoolerMaster Hyper 411R is very easy, it can be done in three simple steps. First you screw the specific piece to the cooler, depending on what cooler you're using. Then you prepare the backplate with the threaded screws that pass through the motherboard. Lastly, put a bit of the included thermal compound on the CPU and screw the two together. Mounting the fan is even easier, simply slide the fan with the pre-installed mounting over the heatsink into the grooves and you're done.
CoolerMaster Hyper 212 EVO
The mounting on the Coolermaster Hyper 212 EVO is basically faultless, the process is very easy for all supported sockets. It is so good because of the two stage installation, stage one involves securing standoffs into the backplate, which is secure on it's own. This means that if you ever needed to remove the cooler to replace thermal compound or replace the CPU, you don't have to remove the motherboard from the case, you simply need to take off the cooler and the backplate and standoffs will stay in place. Once you have the standoffs and backplate installed it's also a very simple process for both AMD and Intel, all you need to do is line up the mounting bracket and screw down all four corners evenly until it cannot go any tighter. Once you have the cooler installed, the fan simply slides on by using the pre-installed plastic fan brackets. The cooler also includes a second set of these brackets should you ever wish to add a second fan to the other side of the cooler.
CoolerMaster MasterAir MA410P
The mounting system used for the MA410P is great, it makes the process very easy for all sockets and allows for the cooler to be very easily removed and reinstalled without removing the motherboard, whether it would be to replace a processor or reapply thermal compound. The first step is to install the backplate and standoffs to the motherboard, this is the same process with both AMD and Intel. Then, much like the CoolerMaster Hyper 212 EVO, you take the mounting bracket, slot it into the hole in the cooler and screw down all four corners evenly. Once that's all installed, the fan simply slides on, then you can connect up the CPU fan and RGB LED header and have a fancy RGB CPU cooler. The 0ne problem I have with the mounting is that it doesn't come with a socket to easily screw in the backplate and base mounting hardware, instead you need to do it up by hand which isn't the easiest process.
be quiet! Pure Rock
It is evident that be quiet! have put a lot of time into developing their mounting for the Pure Rock. It is very well put together and secures the cooler very well, it also manages to support all modern sockets with a small amount of hardware, unlike some coolers which have completely different hardware for each socket, however this does make it feel like it has more steps than it actually needs.
The clip that holds on the Pure Wings 120mm fan works perfectly when installing it, but when it comes to taking it off it can be tricky without damaging the cooler, would be nice to see be quiet! work out another way to do this to make it more user friendly, we like CoolerMaster’s plastic fan holders which also do a good job of containing the airflow. These clips that hold on the fan are good in the fact that they make it very easy to move the fan up and down if you're working with less RAM clearance. One nice thing with the mounting is the slotted top of the standoffs to make it easier to install with a screwdriver.
be quiet! Dark Rock Pro 4
The mounting is one of the main differences the Dark Rock Pro 4 has when compared to the Dark Rock Pro 3, and we're very grateful for this as the Dark Rock Pro 3 was a nightmare to install. be quiet! have managed to support all modern sockets with as little pieces as possible, which of course cuts down costs and makes the user experience better too. It is a basic installation process, something that we don't usually see with huge dual-tower coolers so it is evident that be quiet! have put a lot of time into developing this mounting system.
One of the very nice features are the way you screw the cooler to the backplate assembly, there's two screws between the two heat sinks that normally would be very hard to get to, but the two heat pipe caps nearer to the middle of the cooler are actually fake and can be unscrewed, this reveals cutouts directly above where the cooler screws to the backplate assembly so you can easily access it, they even include a screwdriver that is the perfect length for this!
Unfortunately the mounting isn't all good, the method that be quiet! use to mount the fans to the cooler is pretty terrible. They do use the wire mounting method that many other coolers use, however they have such a small amount of slack they end up being way too tight which makes it almost impossible to install without damaging the ceramic coating or bending the heatsink fins.
Noctua NH-U12S
Noctua have really nailed the mounting of their CPU coolers with the SecuFirm2 mounting kit. Not only is the mounting very secure with almost zero flex when installed, but it's also very easy to install due to the small amount of components. The way the SecuFirm2 mounting works makes it very easy to remove and reinstall the cooler for when you want to reapply thermal compound or change your CPU, this is because instead of having most of the mounting components mount to the cooler, it mounts to the motherboard instead which equates to only having to remove four screws to get the cooler off.
Noctua NH-D15
The mounting of the NH-D15 is actually very easy, something I didn't expect coming into this review considering the sheer size of the cooler, the SecuFirm2 mounting kit really impressed me. Most of the mounting hardware is attached to the motherboard, unlike most other coolers where it is attached to the cooler, this means that you can get the majority of it installed without the huge heatsink in the way, there are only two screws you have to tighten to actually attach the heatsink to the backplate, these screws are conveniently positioned between the two heatsinks, which does require the removal of the center fan but Noctua have made sure this is very easy as it simply slides out.
The fans attach to the cooler using Noctua's classic bent piece of wire method, which does work very well but can be a bit fiddly at times, especially when trying to remove the fan.
It's also worth mentioning that the box is very well laid out, when you first open it you're greeted with with a nicely labelled box that clearly shows what pieces of hardware you need for the socket you're installing the cooler onto. These labels on top of the box also correspond to the location of the specific item inside the box too, which does make the whole mounting experience much easier.
 The graph below is comparing the CFM of the fans that are included with the air coolers.
The trend continues with the NH-D15 and Dark Rock Pro 4 sitting proudly at the top, what we find strange is that they are both topped by the be quiet! Pure Rock which has a much smaller fan, whatever be quiet! have done with that little cooler seems to be doing the job. The rest of the graph is almost as we expected it to be, aside from the NH-U12S being slightly lower than we thought it might be.
These numbers aren't really worth anything without comparison against the noise levels, so below is a graph comparing the noise level of the fans at 100% speed, which is obviously different for each fan.
A few of the things we were confused about when looking at the CFM numbers have been explained by the dBA numbers, especially the NH-U12S with it's incredible 22.4 dBA which according to the internet is the same volume as a whisper or the sound of leaves rustling in the wind. Of course it is no surprise to see the Dark Rock Pro 4 and NH-D15 right next to each other, which seem to be a trend throughout all of the different things we have tested. The loudest being the older CoolerMaster Hyper 212 EVO, which still isn't excessively noisy (especially when you compare it to the AIO fans, where some of the Corsair examples have noise ratings of up to 26 dBA).
The graph below is comparing the CFM of the fans that are included with the air coolers.
The trend continues with the NH-D15 and Dark Rock Pro 4 sitting proudly at the top, what we find strange is that they are both topped by the be quiet! Pure Rock which has a much smaller fan, whatever be quiet! have done with that little cooler seems to be doing the job. The rest of the graph is almost as we expected it to be, aside from the NH-U12S being slightly lower than we thought it might be.
These numbers aren't really worth anything without comparison against the noise levels, so below is a graph comparing the noise level of the fans at 100% speed, which is obviously different for each fan.
A few of the things we were confused about when looking at the CFM numbers have been explained by the dBA numbers, especially the NH-U12S with it's incredible 22.4 dBA which according to the internet is the same volume as a whisper or the sound of leaves rustling in the wind. Of course it is no surprise to see the Dark Rock Pro 4 and NH-D15 right next to each other, which seem to be a trend throughout all of the different things we have tested. The loudest being the older CoolerMaster Hyper 212 EVO, which still isn't excessively noisy (especially when you compare it to the AIO fans, where some of the Corsair examples have noise ratings of up to 26 dBA).
Performance
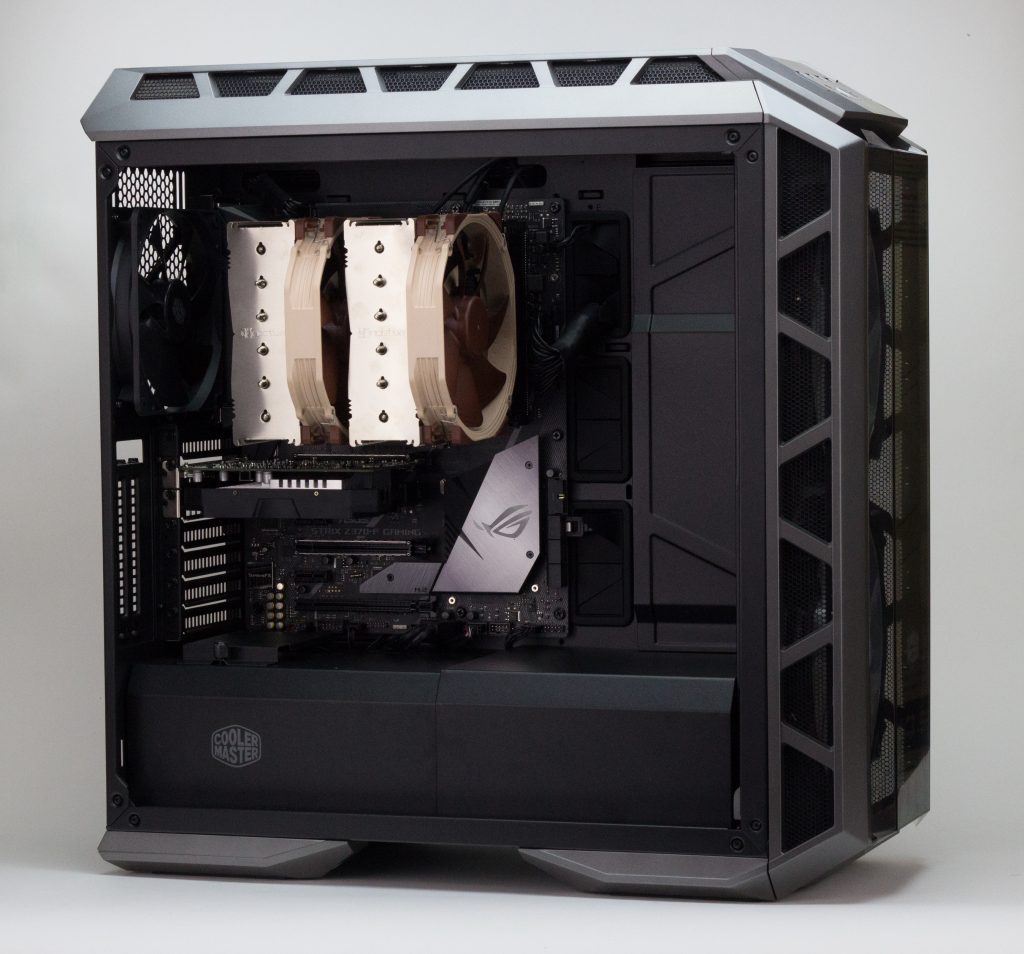
Since this is probably what you're all here to read, let's start with the performance numbers and comparison. We did a load of different tests on each air cooler, but found Prime95 with the "Blend" preset to be much better at comparing the coolers than any other tests so we shall use that to display our results. This test is great because it had a very high range of results, and pushed the CPU pretty far with it's AVX based load. We ran this test with both stock clocks and voltages, and also overclocked. The overclocked settings were 5.0GHz at 1.35v, in the results these tests are marked with "OC". All air coolers were installed in their manufacturer recommended specification, which was generally in a vertical orientation with the fan on the right side of the cooler (unless there was multiple fans, of course).
Test System Specs
- Processor - Intel i7 8700k - Case - CoolerMaster H500P - RAM - Corsair Vengeance DDR4 16GB 3000Mhz (2x8) - Motherboard - Asus Rog Strix Z370-F - SSD - Samsung 860 EVO 250GB - PSU - Corsair RM750x - GPU - EVGA GTX 1050TiAesthetics
We would be lying if we said that aesthetics didn't matter when considering buying a cooler for your CPU, of course it does! In the world of RGB and all of the other fancy looking stuff there aren't many coolers that disappoint when it comes to aesthetics but here we will go over the aesthetics of each cooler we looked at.
Noctua NH-U12S
Now this is one of the coolers that don't quite make it into the "good looking" list of air coolers. When making this cooler we're sure Noctua didn't really worry about how it looked. The fan that comes with the cooler is in Noctua's signature two tone brown colour scheme. Overall the aesthetic isn't bad, we like the no thrills look of the tower with the exposed heatpipes, it's really just the fan that ruins it for us, throw one of Noctua's Chromax or Redux range and you've got something that looks great!
We'd like to write a little more about the Chromax range of products from Noctua mentioned above as these offer upgrades to the U12S that make it look much nicer. The main one being a cover that goes over the top to hide the top plate and exposed heat pipes, these do look very good and come in many colours and designs so finding one that fits your colour scheme won’t be a problem! The Chromax line also has all black fans and different coloured anti-vibration tabs for those fans, so with a bit more money invested you can make the U12S look very good!
Noctua NH-D15
Once again, like the NH-U12S this cooler has all the same aesthetic traits including the no thrills performance oriented design, and the somewhat infamous brown fan. Also like the U12S, there is fortunately the option to customise it with the Chromax range of products. There's also talk of Noctua offering full black models of their cooler in the near future which we can't wait for!
CoolerMaster Hyper 212 EVO
Much like the Noctua coolers, the aesthetics of the Hyper 212 EVO aren't really too important, it's a very basic looking cooler without any fancy covers or even fancier RGB fans, it's just a simple air cooler with aluminium fins, copper heatpipes and a fan. One design element that does add to the aesthetics is the embossed CoolerMaster logo on the top fin,which does look good. Also, unlike a certain other manufacturer, the fan is black and does look quite good. Other than that there isn't much else to say, it's a fairly industrial looking cooler with an unoffensive design so should fit in with most builds.
be quiet! Pure Rock
The Pure Rock really hits it out of the park when it comes to looks, the top of the cooler really steals the show with its brushed aluminium top fin, heat pipe caps and the be quiet! logo and grooves cut out of the top fin. The fan also looks very good with the all black design that be quiet! is known for. Compared to other coolers in this price bracket, we’d say this is the best looking of them all. No it doesn’t have addressable RGB fans or coloured heatsink covers but the look it does have makes it look like a premium product, and we're sure that's exactly what be quiet! were trying to achieve when designing this cooler.
CoolerMaster Hyper 411R
The CoolerMaster Hyper 411R does not do a bad job when it comes to aesthetics, no it doesn't have a fancy black coating, addressable RGB fans or a brushed aluminium top but what can you expect from a cooler that costs less than £20. What it does have is a stamped CoolerMaster logo on the top fin, also with a stamped design that compliment the angles of the heatsink.
The included fan is all black with translucent blades in order to make the four white LEDs more vivid, the fan is the only part of the aesthetics that I'd like to see changed, the only sort of illumination you get is four lines of light from the LEDs to the centre of the cooler, it doesn't really look that great. There's also no way to turn off the LEDs unless you want to de-solder them.
CoolerMaster Hyper MA410P
The MA410P is a very good looking CPU cooler, the top fin is black instead of the regular raw aluminium which does make it look much better, this fin also has an embossed CoolerMaster logo. Obviously the main aesthetic point is the RGB fan, it isn't the best lighting from a fan we've seen, but the best that comes on a fairly well priced air cooler. The fan has LEDs in the centre which illuminate the entirety of the clear blade. The fan terminates in a regular RGB header so you have the option of connecting it to either the included controller, or directly into the motherboard which is a nice feature that some other manufacturers fail to accommodate.
be quiet! Dark Rock Pro 4
Wait what? We're putting a cooler without RGB at the top of the aesthetics list? You might think we've gone insane by not embracing the RGB overlords, but hear us out.
The Dark Rock Pro 4 is a very very good looking cooler, in our opinion it's the best looking dual-tower design cooler you can buy. The cooler comes with a black coating on all of the fins which helps with it's good looks, now this coating looks like it would negatively affect performance but it actually does the complete opposite, this coating contains specially developed ceramic particles that aid in the exchange of heat from the aluminium fin to the air, something really clever that be quiet! have developed!
We really like the top plate on the Dark Rock Pro 4 as it has a few different things that improve the look of the cooler, the first being the top plate itself which is a nice black brushed aluminium piece that covers the heatsinks perfectly. There are also heatpipe caps mounted to this plate, this really improves the look of the coolers too. Finally, instead of having holes to fit a screwdriver through the plate in order to mount the cooler, there are cleverly designed covers that look the same as the heatpipe caps that simply screw out allowing for easy installation.
The fans only add to the great looks of the Dark Rock Pro 4, the all black design with the simple be quiet! logo complement the colours of the rest of the cooler, the fan cables are also braided with black connectors to keep with the stealthy black aesthetic. When it comes down to the aesthetics, there is really nothing that we would change with the Dark Rock Pro 4.
Mounting
Ease of installation is very important when it comes to considering what CPU Cooler to buy, fortunately Air Cooler mounting has evolved massively in the past few years which means that nobody really gets it that wrong.
CoolerMaster Hyper 411R
Mounting the CoolerMaster Hyper 411R is very easy, it can be done in three simple steps. First you screw the specific piece to the cooler, depending on what cooler you're using. Then you prepare the backplate with the threaded screws that pass through the motherboard. Lastly, put a bit of the included thermal compound on the CPU and screw the two together. Mounting the fan is even easier, simply slide the fan with the pre-installed mounting over the heatsink into the grooves and you're done.
CoolerMaster Hyper 212 EVO
The mounting on the Coolermaster Hyper 212 EVO is basically faultless, the process is very easy for all supported sockets. It is so good because of the two stage installation, stage one involves securing standoffs into the backplate, which is secure on it's own. This means that if you ever needed to remove the cooler to replace thermal compound or replace the CPU, you don't have to remove the motherboard from the case, you simply need to take off the cooler and the backplate and standoffs will stay in place. Once you have the standoffs and backplate installed it's also a very simple process for both AMD and Intel, all you need to do is line up the mounting bracket and screw down all four corners evenly until it cannot go any tighter. Once you have the cooler installed, the fan simply slides on by using the pre-installed plastic fan brackets. The cooler also includes a second set of these brackets should you ever wish to add a second fan to the other side of the cooler.
CoolerMaster MasterAir MA410P
The mounting system used for the MA410P is great, it makes the process very easy for all sockets and allows for the cooler to be very easily removed and reinstalled without removing the motherboard, whether it would be to replace a processor or reapply thermal compound. The first step is to install the backplate and standoffs to the motherboard, this is the same process with both AMD and Intel. Then, much like the CoolerMaster Hyper 212 EVO, you take the mounting bracket, slot it into the hole in the cooler and screw down all four corners evenly. Once that's all installed, the fan simply slides on, then you can connect up the CPU fan and RGB LED header and have a fancy RGB CPU cooler. The 0ne problem I have with the mounting is that it doesn't come with a socket to easily screw in the backplate and base mounting hardware, instead you need to do it up by hand which isn't the easiest process.
be quiet! Pure Rock
It is evident that be quiet! have put a lot of time into developing their mounting for the Pure Rock. It is very well put together and secures the cooler very well, it also manages to support all modern sockets with a small amount of hardware, unlike some coolers which have completely different hardware for each socket, however this does make it feel like it has more steps than it actually needs.
The clip that holds on the Pure Wings 120mm fan works perfectly when installing it, but when it comes to taking it off it can be tricky without damaging the cooler, would be nice to see be quiet! work out another way to do this to make it more user friendly, we like CoolerMaster’s plastic fan holders which also do a good job of containing the airflow. These clips that hold on the fan are good in the fact that they make it very easy to move the fan up and down if you're working with less RAM clearance. One nice thing with the mounting is the slotted top of the standoffs to make it easier to install with a screwdriver.
be quiet! Dark Rock Pro 4
The mounting is one of the main differences the Dark Rock Pro 4 has when compared to the Dark Rock Pro 3, and we're very grateful for this as the Dark Rock Pro 3 was a nightmare to install. be quiet! have managed to support all modern sockets with as little pieces as possible, which of course cuts down costs and makes the user experience better too. It is a basic installation process, something that we don't usually see with huge dual-tower coolers so it is evident that be quiet! have put a lot of time into developing this mounting system.
One of the very nice features are the way you screw the cooler to the backplate assembly, there's two screws between the two heat sinks that normally would be very hard to get to, but the two heat pipe caps nearer to the middle of the cooler are actually fake and can be unscrewed, this reveals cutouts directly above where the cooler screws to the backplate assembly so you can easily access it, they even include a screwdriver that is the perfect length for this!
Unfortunately the mounting isn't all good, the method that be quiet! use to mount the fans to the cooler is pretty terrible. They do use the wire mounting method that many other coolers use, however they have such a small amount of slack they end up being way too tight which makes it almost impossible to install without damaging the ceramic coating or bending the heatsink fins.
Noctua NH-U12S
Noctua have really nailed the mounting of their CPU coolers with the SecuFirm2 mounting kit. Not only is the mounting very secure with almost zero flex when installed, but it's also very easy to install due to the small amount of components. The way the SecuFirm2 mounting works makes it very easy to remove and reinstall the cooler for when you want to reapply thermal compound or change your CPU, this is because instead of having most of the mounting components mount to the cooler, it mounts to the motherboard instead which equates to only having to remove four screws to get the cooler off.
Noctua NH-D15
The mounting of the NH-D15 is actually very easy, something I didn't expect coming into this review considering the sheer size of the cooler, the SecuFirm2 mounting kit really impressed me. Most of the mounting hardware is attached to the motherboard, unlike most other coolers where it is attached to the cooler, this means that you can get the majority of it installed without the huge heatsink in the way, there are only two screws you have to tighten to actually attach the heatsink to the backplate, these screws are conveniently positioned between the two heatsinks, which does require the removal of the center fan but Noctua have made sure this is very easy as it simply slides out.
The fans attach to the cooler using Noctua's classic bent piece of wire method, which does work very well but can be a bit fiddly at times, especially when trying to remove the fan.
It's also worth mentioning that the box is very well laid out, when you first open it you're greeted with with a nicely labelled box that clearly shows what pieces of hardware you need for the socket you're installing the cooler onto. These labels on top of the box also correspond to the location of the specific item inside the box too, which does make the whole mounting experience much easier.
Fans
In this section of the article I will compare the fans that are included with the coolers, including comparisons of the manufacturer specified noise levels and airflow.
The graph below is comparing the CFM of the fans that are included with the air coolers.
The trend continues with the NH-D15 and Dark Rock Pro 4 sitting proudly at the top, what we find strange is that they are both topped by the be quiet! Pure Rock which has a much smaller fan, whatever be quiet! have done with that little cooler seems to be doing the job. The rest of the graph is almost as we expected it to be, aside from the NH-U12S being slightly lower than we thought it might be.
These numbers aren't really worth anything without comparison against the noise levels, so below is a graph comparing the noise level of the fans at 100% speed, which is obviously different for each fan.
A few of the things we were confused about when looking at the CFM numbers have been explained by the dBA numbers, especially the NH-U12S with it's incredible 22.4 dBA which according to the internet is the same volume as a whisper or the sound of leaves rustling in the wind. Of course it is no surprise to see the Dark Rock Pro 4 and NH-D15 right next to each other, which seem to be a trend throughout all of the different things we have tested. The loudest being the older CoolerMaster Hyper 212 EVO, which still isn't excessively noisy (especially when you compare it to the AIO fans, where some of the Corsair examples have noise ratings of up to 26 dBA).